


Congratulations! You have survived THE HOLD (in case you haven’t made it past the tutorial deck, make sure you check out our guide for it first). You are now in Fort Joy, one of the largest areas in Divinity Original Sin 2. New dangers, foes, and friends are waiting!
We’ve put together the most comprehensive Fort Joy walkthrough, together with a detailed map for unexpected locations and extra tips for all encounters. Enjoy! 🙂

Step 1
Ok guys, let’s start this Fort Joy walkthrough. Be warned, this guide is pretty long! We added markers for every important Fort Joy map location, and you can click on them to be sent to the map.
Note that in this game, you will encounter different quests like in the stages at the prison and my favorite, the Elven Caverns.
The beach is where you will wake up after your brush with death. There are a few things to take a look at if you are into exploring the world, including a statue of Braccus Rex just to your east. You should also probably head to this statue to make sure you get the waypoint. Though you will not be coming to this particular location often, it is nice to have for a few items we will get a little later on.
 and (max-width: 480px) 480px, (min-width: 481px) 960px, 100vw” data-lazy-src=”https://unleashthegamer.com/wp-content/uploads/2020/08/Fort-Joy-Overworld-step-1.png” /></span></div>
<div class= "Fort-Joy-Overworld-step-1")
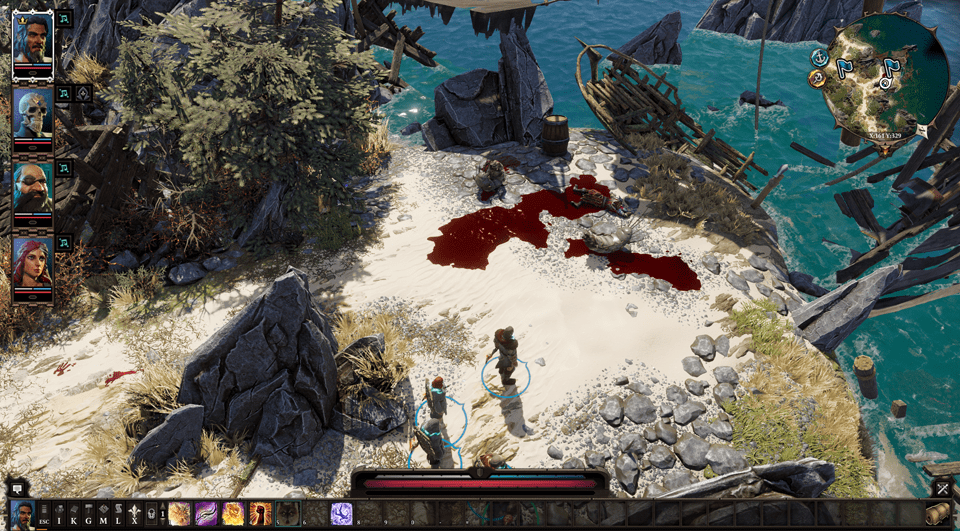
Step 2
Just south of the beach, you will encounter two voidspawn who apparently survived the shipwreck. They are pretty easy to notice as they are both standing beside a pretty significant pool of blood and the corpse of magister Jalen. Kill them both and loot the area.
 and (max-width: 480px) 480px, (min-width: 481px) 960px, 100vw” data-lazy-src=”https://unleashthegamer.com/wp-content/uploads/2020/08/Fort-Joy-Overworld-step-2.png” /></span></div>
<div class= "Fort-Joy-Overworld-step-2")
Step 3
 and (max-width: 480px) 480px, (min-width: 481px) 960px, 100vw” data-lazy-src=”https://unleashthegamer.com/wp-content/uploads/2020/08/Fort-Joy-Overworld-step-3.png” /></span></div>
<div class= "Fort-Joy-Overworld-step-3")
Step 4

Step 5

Step 6

Step 7

Step 8

Now, if you did decide to do the “Kill Alexander and/or Dallis route,” unfortunately, Magister Borris will have been caught in the crossfire. If you have Ifan in your group, he will want a specific note off of Borris’s body to continue his side quest chain. Borris will also have a key that can be used on the gate at (14).
Step 9
There are a couple of people around this area to talk to:
Magister Yarrow: She will ask you if you have seen a large inmate by the name of Migo. This will start the quest, The Murderous Gheist.
Fara: Just to the south of Yarrow, you will find Fara, a grieving mother who is looking for her missing daughter. She will not give you the quest if you speak with her as an elf, so use another character to do so. You should also ask for her daughter’s doll, which she will provide. After that, if you ask for the doll again, she will not be able to find it. This shows that she has mental health concerns. She will also not accept that her daughter is dead after you obtain that news from Jeth. Note: This used to be part of a quest called Every Mother’s Nightmare, but it has been removed from the game in the definitive edition. It was never finished in the initial release either.
Jeth: He will tell you that Fara’s daughter was killed by Voidwoken a month prior and that her daughter had never even been to Fort Joy. Fara has gone mad with grief.

Step 10
There is a trio of gamblers here who will try to sucker you into playing. Though you will have a pretty good hand, you will lose. You can accept your loss and leave or you can fight and kill the gamblers. A better plan is to avoid this entire conversation until after you have spoken to Doctor Leste and Dain at (20). Once you have obtained the sparkler card, you can go back and win against the gamblers. They will not be particularly happy about losing and will attack you. Kill them and loot their bodies.

Step 11

Step 12
Gawin: He offers you a chance of escape if you will just go with him alone. But first, he needs you to retrieve an item that will fuel your escape. This item is a pair of gloves that will allow you to teleport him out. He does mention that the gloves are under the watchful gaze of a few Crocodilians, which you are definitely going to have to fight in order to get the gloves. He also sells Aerotheurge spells. So just keep that in mind. This encounter will start the quest, The Teleporter.

Once you have the gloves in question, he will tell you to follow him. Travel to area (7), where he will ask you to teleport him down to the tree trunk. Do so, and he will teleport you to him. You will then teleport him across the gap, where he will abandon you. It turns out he is a jerk.
Laslor: He won’t have much to say unless you talk to him with Beast or Lohse in your group. If you have these characters, some songs will be sung. If you have Lohse in your group in particular, the dwarf will recognize her and ask her for a song. She will begin to play, but things will go awry. Something is clearly wrong with Lohse regarding her musical talents. Something evil does not want her to sing.
Saam is A lizardman who is desperately trying to diffuse a volatile situation after he told Baladir his wife might be better off dead than in the care of the Magisters. Baladir does not take kindly to this and straight-up kills Saam. You can loot him, of course.
Baladir is A grieving human who is in the process of burying his wife. He is having an argument with Saam regarding how lucky his wife is to be dead. This inevitably ends with a knife to the throat and a dead Saam. If you talk with him further, you will discover that he is building a coffin for his wife and that she would have jokingly complained about the construction quality. The man is clearly grieving. He doesn’t have much to say after that.
Step 13
There are a few things you are going to want to interact with and people you are going to want to talk to. I will, however, hazard a warning here. If you chose to skip the encounter at the gate to Fort Joy, you are going to want to stay clear of that area so that you do not trigger the event by accident.
Lohse: The first person you are probably going to want to talk to is Lohse, who survived the boat’s destruction and has made herself at home. She also has a few concerning demonic moments that may make you rethink bringing her along in your group, but I would recommend you do so. Her side quest is one of my favorites in the game. She is also a very amusing character. If you have her join your group, you will start the quest, Lohse.
Statue of the Divine: This is another waypoint. You don’t necessarily have to click on it, but if you want the full immersive atmosphere of the game, you should do so. After you have talked to Withermoore in the Elven Cave, you will also find a hidden button here that will open hatch to the map Fort Joy—Underground Tunnel.
Ifan Ben-Mezd: This lone-wolf operative fills the mercenary with a heart of gold. He is in Fort Joy for a specific reason and to complete a specific task. I really enjoy his personality and his side-quest, so I would recommend bringing him along. If you read the note in his inventory, you will also begin the quest Ifan Ben Mezd/A Wolf Alone.
 and (max-width: 480px) 480px, (min-width: 481px) 960px, 100vw” data-lazy-src=”https://unleashthegamer.com/wp-content/uploads/2020/08/Fort-Joy-Overworld-step-13.png” /></span></div>
<div class= "Fort-Joy-Overworld-step-13")
Kana, Burro, and Elodi You will witness an encounter between these three here. It appears that Kana and Burro are shaking down poor Elodi for some money for a man named Griff. You can choose to side with the elf or the humans. I would advise siding with the elf, as it will give you some street cred with the long-eared folk. Also, if you are playing as Ifan, you will be able to get Kana and Burro to run away just by mentioning that you are, or were, a member of the Lone Wolves. Apparently, they are kind of a big deal. Elodi will ask you to follow her to a safe place, but we don’t need to worry about that for now. This encounter will start the quest, The Shakedown.
Nebora, the blacksmith of Fort Joy, is a rather gruff individual. If you have Fane in your group, he will want to speak with her privately, where he will literally ask about her ability to make him a “faceripper”. This will give you some knowledge about a man named Niles. We will find out all about him later, though. In addition to some basic crafting equipment, she also sells summoning books. Just a heads-up. Nebora will also be able to remove your source collar if you are successful in becoming champion of the Fort Joy Arena, which I will cover later in this guide.
Step 14
There is also a nearby gate with a few Magisters guarding it. You can initiate combat and kill them, but hold off for now.
 and (max-width: 480px) 480px, (min-width: 481px) 960px, 100vw” data-lazy-src=”https://unleashthegamer.com/wp-content/uploads/2020/08/Fort-Joy-Overworld-step-14.png” /></span></div>
<div class= "Fort-Joy-Overworld-step-14")
Step 15
Griff and Amyro: Here you will find one of the major players in Fort Joy, Griff. You will be able to find out more about his past later in the game, but from first impressions, you will probably find him to be a scummy opportunist who has used his limited authority and control of food to become a pseudo-tyrant. You can speak with him about things going on at Fort Joy, but you won’t get much out of him until you speak to his prisoner, Amyro.
Once you speak with Amyro, you will discover that Griff has had a crate of citrus go missing. Amyro is the alleged culprit, but you can offer to look into this crime to make sure that Griff has the right person. You can get into a fight if you try to force Griff to release the Elf without finding the fruit, so in the interests of keeping the peace for now, leave and investigate the crime. This will give you the quest: The Imprisoned Elf.
After you have obtained the oranges from Stingtail, he will free Amyro, who will tell you that he knows a way out of the Joy but that he is also the protector of a young Elven girl named Saheila. He asks for your help in getting word to Saheila’s people on the mainland that she is still in Fort Joy. He will also give you an amulet, which you cannot wear yet due to the Source Collar. This will start the quest Saheila’s People.
 and (max-width: 480px) 480px, (min-width: 481px) 960px, 100vw” data-lazy-src=”https://unleashthegamer.com/wp-content/uploads/2020/08/Fort-Joy-Overworld-step-15.png” /></span></div>
<div class= "Fort-Joy-Overworld-step-15")
Hilde: A woman named Hilde also patrols around this area. She sells Scoundrel skills and some other miscellaneous items.
Butter: There is another woman named Butter. She is a sweet young woman who you can flirt with and she has Huntsman skills.
You will also be able to find a hatch here that leads down into the map Fort Joy—Arena of the One.
Step 16
This is where you will find Beast, one of the playable NPCs you can recruit. He is a surly Dwarf who can make a pretty good addition to your team. He is probably my least-used character so while I was playing through the game for this guide, I decided to bring him along with me. If you have him join your group, you will start the quest, Beast.
You will also find a crab in the area known as Septa the Ineffable. This crab is apparently a source of great might and it may know a way out of the Fort. Unfortunately, it chooses not to help you in any way. It is kind of a jerk, honestly.
 and (max-width: 480px) 480px, (min-width: 481px) 960px, 100vw” data-lazy-src=”https://unleashthegamer.com/wp-content/uploads/2020/08/Fort-Joy-Overworld-step-16.png” /></span></div>
</div>
</div>
<div class= "Fort-Joy-Overworld-step-16")
Step 17
There are three individuals in this area that you can interact with.
Narin: This is a man who is specifically waiting for the Red Prince. If you do not have the Red Prince in your party, you will not have a lot to do with this person, but if you do, he will attack you. You can also kill him yourself for the experience. He gives a fair amount so it is worth doing.
Margo: This woman is profoundly lonely. Her entire family was brought to the Joy and one by one they were taken by the Magisters. She wonders if they have all been freed. Allow her to tell you her story and she will give you a restoration scroll for listening.
Maol: Just south of Margo, you will find Maol on the beach. He will give you an item based on which character you speak with him with and which answer you give. He also sells geomancy skills.
 and (max-width: 480px) 480px, (min-width: 481px) 960px, 100vw” data-lazy-src=”https://unleashthegamer.com/wp-content/uploads/2020/08/Fort-Joy-Overworld-step-17.png” /></span></div>
</div>
</div>
<div class= "Fort-Joy-Overworld-step-17")
Step 18
This is where you will find Sebille. She is a playable NPC that can join your group. She is also a deeply troubled elf who will end up killing a lot of people during your playthrough. She does have a very cool side-quest involving the Elves and the Mother tree, though. If you have her join your group, you will begin the quest, Sebille.
 and (max-width: 480px) 480px, (min-width: 481px) 960px, 100vw” data-lazy-src=”https://unleashthegamer.com/wp-content/uploads/2020/08/Fort-Joy-Overworld-step-18.png” /></span></div>
</div>
</div>
<div class= "Fort-Joy-Overworld-step-18")
Step 19
This is where you will find Stingtail. He is actually useful for three quests. He is the actual culprit who stole Griff’s oranges, though it turns out they were actually just a vessel for drugs. If you have Sebille in your group, she will also want to have a quick and lethal word with him.
The only problem with killing this rather annoying NPC is that he is the only merchant that sells pyromancy skills until you reach the Shrine of Amadia. This isn’t a huge concern, though, so feel free to kill him and take the oranges.
The elf you can free is much more important than this guy. He will also drop a bunch of pyromancer books when he dies anyway.
I would also note that you can initiate a quest with Stingtail called Redemption. He will ask you to get some more Drudenae before providing you with information regarding the other dreamers. This is a part of the Red Prince’s side quest. You will not have access to this quest if he is not in your group.
If you have Sebille in your group, she will also kill him right away, so just make sure you have completed the other quests first before you let her talk to him.
 and (max-width: 480px) 480px, (min-width: 481px) 960px, 100vw” data-lazy-src=”https://unleashthegamer.com/wp-content/uploads/2020/08/Fort-Joy-Overworld-step-19.png” /></span></div>
</div>
</div>
<div class= "Fort-Joy-Overworld-step-19")
Step 20
Doctor Leste and Dain: There is a man here who ran afoul of the gamblers. The Doctor is treating him but she wants some alcohol. You can give her some liquor and get some experience. You can also heal Dain and he will give you a card known as the Sparkler. Leste also sells polymorph skills.
Buddy: Buddy is a dog. The best dog. You will need Pet Pal to speak with him, but I highly recommend you do. It turns out that Buddy is a little bit depressed. He let’s you know that his mate Emmie has gone missing. If you are kind to him and offer him some well-deserved scratches, he will provide you with a key known as “Buddy’s Key”. This will also initiate the quest, Finding Emmie.
To the south of the Doctor and Dain, you should see the entrance to a cave. This cave houses the Elves. Now it is very important you do not bring Lohse into this cave. You can end up in a battle with the Elves if you do so. Leave her outside and do the talking with another character. Entering the transition point will take you to the map Fort Joy—Elven Cave.
 and (max-width: 480px) 480px, (min-width: 481px) 960px, 100vw” data-lazy-src=”https://unleashthegamer.com/wp-content/uploads/2020/08/Fort-Joy-Overworld-step-20.png” /></span></div>
</div>
</div>
<div class= "Fort-Joy-Overworld-step-20")
Step 21
This is where you will find the horrifying revenant, Migo. He is a level-three creature. Before you approach him, pick up a Yarrow flower. They grow in various locations around the island so it should not be particularly hard to find one. This will pacify him. Now that he is pacified, head back to (9) and let Magister Yarrow know where Migo is. She will go to see him, giving you a bunch of experience. You should then kill them both for extra experience and the fact that he is a ravenous ghoul. Yes, he has a sad story, but let’s face facts. He flat-out murdered and ate at least a couple of people and would probably continue to do so. This will also net you Migo’s Ring, which is a decent healing item for the early stages of the game, and Migo’s Breastplate, which is a pretty decent piece of chest armor. This will end the quest, The Murderous Gheist.
Just to the north of Migo is a pile of sand that you can shovel to reveal a path to the map Fort Joy—Underground Tunnel.
 and (max-width: 480px) 480px, (min-width: 481px) 960px, 100vw” data-lazy-src=”https://unleashthegamer.com/wp-content/uploads/2020/08/Fort-Joy-Overworld-step-21.png” /></span></div>
</div>
</div>
<div class= "Fort-Joy-Overworld-step-21")
Step 22
This is where you will find the Crocodiles who are in possession of the teleportation gloves. They are level three, so you shouldn’t have too much trouble killing them. The Crocodile that has magical defense is the one with the gloves and is also the hardest to kill for obvious reasons. Once they are dead, loot one of the most useful items in the early game. The gloves of teleportation will grant you the infinite ability to teleport people and objects around. This will open up the possibility for you to find and gather a lot of secret treasures and access previously inaccessible areas. One such area is to the north of the dead crocodiles.
 and (max-width: 480px) 480px, (min-width: 481px) 960px, 100vw” data-lazy-src=”https://unleashthegamer.com/wp-content/uploads/2020/08/Fort-Joy-Overworld-step-22.png” /></span></div>
<div class= "Fort-Joy-Overworld-step-22")
There is a small rocky outcropping with a basket and some bottles of beer abandoned. It’s not of any particular importance, but if you were looking to grab some alcohol, teleport a character over there and loot it all.
You should also loot the body of Magilla, who has a bloodstained journal on his corpse. Reading it will let you know that there is a vault on the island and will begin the quest, The Vault of Braccus Rex.
Step 23
In this area, you will find two NPCs, Coral and Unnis.
Coral: This scared child will tell you that she is afraid of lizards because her master was a lizard and that the lady lizard had sent Coral and her parents to Fort Joy. If you comfort the girl, she will give you a scroll.
Unnis: This highly defensive elf will initially tell you to leave immediately. No matter what you say, if you are a human, you will not be able to speak with her further. In order to get past this barrier, simply speak to her with a non-human character. She will ask if an unknown female sent you and if you are from the shelter. If you lie to her, you can extort some money from her, but if you are playing a good character, she will simply ask you to leave and lead no one here.
 and (max-width: 480px) 480px, (min-width: 481px) 960px, 100vw” data-lazy-src=”https://unleashthegamer.com/wp-content/uploads/2020/08/Fort-Joy-Overworld-step-23.png” /></span></div>
</div>
</div>
<div class= "Fort-Joy-Overworld-step-23")
Step 24
Here, you will find a few ancient turtles just lazing around. If you approach the largest of the turtles, they will become corrupted, and you will have to fight them. I don’t know of any way to avoid this so you will have to put them out of their corrupt existence. It is worth some experience so I would recommend doing this. The largest turtle will also drop a poison wand called the turtle claw.
On the body of a bloated corpse, you will find a soggy diary. You will discover that the man had a rough go of things at the Joy and decided to give swimming to freedom a shot. It apparently did not go particularly well.
In this area, there is also a chest to the west you should grab. It requires a lockpick to open.
 and (max-width: 480px) 480px, (min-width: 481px) 960px, 100vw” data-lazy-src=”https://unleashthegamer.com/wp-content/uploads/2020/08/Fort-Joy-Overworld-step-24.png” /></span></div>
</div>
</div>
<div class= "Fort-Joy-Overworld-step-24")
Step 24(a)
More importantly, just to the east of the area is a rather large and broken ship. You will find a lot of dead people on the boat. There are also a handful of Magisters who have cornered an elf. The Magisters seem to be of the opinion that the Elf murdered the crew of the ship after she crashed it. She is of the opinion that the crew killed themselves when they tried to take her spores.
You can side with the elf against the magisters, but if you do that, you won’t be allowed to loot the Greaves and Boots of contamination. You always have the option to kill everyone aboard. The Magisters are evil; we know that, Who knows what the elf is doing? If you don’t kill her now, you will get another chance later or you can keep her alive the whole quest. (Up to you). Anyway, once you have dealt with the situation, you should loot everything around you.
” width=”960″ height=”540″ data-dominant-color=”695b52″ data-has-transparency=”false” data-lazy-srcset=”https://unleashthegamer.com/wp-content/uploads/2020/08/Fort-Joy-Overworld-step-24a.png 960w, https://unleashthegamer.com/wp-content/uploads/2020/08/Fort-Joy-Overworld-step-24a-480×270.png 480w” data-lazy-sizes=”(min-width: 0px) and (max-width: 480px) 480px, (min-width: 481px) 960px, 100vw” data-lazy-src=”https://unleashthegamer.com/wp-content/uploads/2020/08/Fort-Joy-Overworld-step-24a.png” /></span></div>
<div class= "Fort-Joy-Overworld-step-24(a)")
The most important thing to loot is either a Contaminated Magisters Foot or the remains of the elf Scion. If you have an elf in your party, you can simply eat it with them; if you don’t, wait until you have the Mask of the Shapeshifter and then use it to turn into an elf and eat the remains. This will teach you a skill called Trigger Spores.
The other important things to grab on the boat are the Flawed Contamination Spore and a book that tells you the location of other spores. The questline associated with this event, Seed of Power, continues in Act 2.
Step 25
Once everyone is up on the ledge, lockpick the door or break it down. You will find yourself in a relatively small chamber, which is Orivand’s room, full of loot. Take anything you want, but be careful you don’t enter the next room yet. You will be involved in a fight if you do.
 and (max-width: 480px) 480px, (min-width: 481px) 960px, 100vw” data-lazy-src=”https://unleashthegamer.com/wp-content/uploads/2020/08/Fort-Joy-Overworld-step-25.png” /></span></div>
<div class= "Fort-Joy-Overworld-step-25")
One item of particular note that you should pick up is the book Dwarven Customs and Traditions. This will begin the quest, Keep Calm and Carrion. Unfortunately, you will not be able to complete this quest until Act 2 so just hang onto the book for now.
Once you are finished looting everything and you feel ready for a fight, feel free to open the door and face off against the High Judge himself.
Step 26
 and (max-width: 480px) 480px, (min-width: 481px) 960px, 100vw” data-lazy-src=”https://unleashthegamer.com/wp-content/uploads/2020/08/Fort-Joy-Overworld-step-26.png” /></span></div>
<div class= "Fort-Joy-Overworld-step-26")
Step 27
This is a room that could loosely be described as an antechamber for the Court at (26). It has a few treasures littered around and a few paintings. It also has a stairwell that leads back down to the map Fort Joy—Dungeon.
 and (max-width: 480px) 480px, (min-width: 481px) 960px, 100vw” data-lazy-src=”https://unleashthegamer.com/wp-content/uploads/2020/08/Fort-Joy-Overworld-step-27.png” /></span></div>
</div>
</div>
<div class= "Fort-Joy-Overworld-step-27")
Step 28
Here you will encounter Paladin Cork being dressed down by Magister Captain Trippel. There will be several level four magisters in the area just jonesing for a fight. In order to get the best ending to this particular encounter, you should aim to keep Paladin Cork alive.
This is not as easy as you may think, as he has a penchant for racing into danger against all odds. The hardest part of this entire fight is keeping that suicidal warrior alive. Once you have defeated your enemies, speak to Cork. It turns out that he was sent here to investigate what exactly goes on at Fort Joy. It also turns out that the Magisters have decided to take matters into their own hands, bringing them into conflict with their brother organization, the Paladins.
 and (max-width: 480px) 480px, (min-width: 481px) 960px, 100vw” data-lazy-src=”https://unleashthegamer.com/wp-content/uploads/2020/08/Fort-Joy-Overworld-step-28.png” /></span></div>
</div>
</div>
<div class= "Fort-Joy-Overworld-step-28")
Step 29

Step 30
This door will lead you to the docks. There will be a pretty hefty fight in store for you once you enter this area, but assuming you have cleared most of the other encounters in this zone beforehand, it should really not provide much of a challenge. You should also note, while exploring the docks, that you will find the body of Gawin, assuming you teleported him over to this area as requested. It seems his little stunt did not go too well, and he got his just deserts after all. Gawin’s body will have a unique robe and some skill books for Aerotheurge. You should pick them up.
We hope you enjoyed our Divinity Original Sin 2 Fort Joy walkthrough, and make sure to check out all our other pages and guides for more info on secrets and side-quests. As we mentioned before, this game is huge, and the area around Fort Joy is quite impossible to figure out completely on one’s own!

You May Also Like


More From Author


Maximizing Space: Creative Design Solutions for Small Garage Interiors


+ There are no comments
Add yours